
Fürsten von Florenz
Fuersten (Originalregel)
Game preparation
With /join can enter 3-5 players into the game. With /start the game begins. Alternatively, you can use the game management use.
The game
Florence - Hochburg and Tummelplatz of all kinds of artists. Each player tries as much as possible to win prestige for his court by engaging artists who perform works there and by expanding his court.
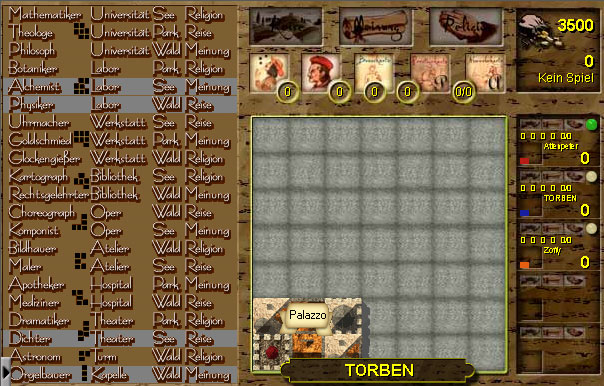
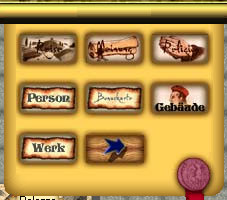
Field
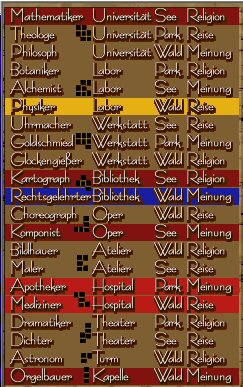
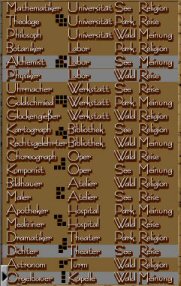
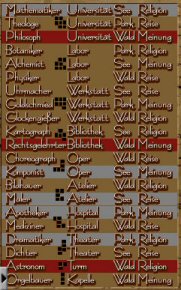
On the left is a list of all artists in the game with the associated buildings, landscapes and freedoms. A person has a gray background when you have to choose between her and other people (see picture above). A person with a bright colored background was played by the corresponding player and can be discarded (own artists cannot be discarded!). A person with a dark, colored background belongs to oneself and can still be played.
The example shows the artist table from the point of view of the red player: he has already played the mathematician, cartographer, composer and organ maker on his hand, pharmacist and physician. Yellow has played the physicist so far, blue the legal scholar.
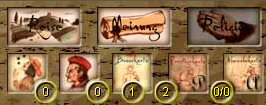
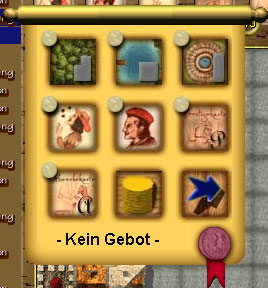
In the middle of the field you can see his own playing board. In the upper line, the freedoms are displayed; the one you already own appear bright. The second line lists (from left to right), how many crooks, builders, bonus, prestige and competition cards you have. There are two values for debit cards: the left indicates how many unused one still has, the right, how many (nun consumed) were played by other players on their own. By clicking on the icon for bonus and prestige cards, they are displayed in detail; a click on the promotion icon closes these windows again. If you do the latter on your own train in phase B and have at least one pickup card, you will get the pickup menu that you can close again by clicking on the X if you want to cancel it for later.

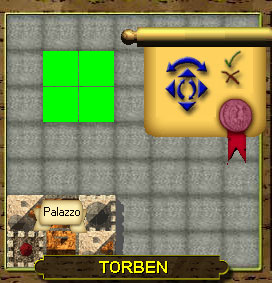
Here the own money supply (1400), the previously collected, own prestige points (6) as well as the current number of rounds (5) and the required number of works (15) are displayed.

Below is the construction plan on which the buildings and landscapes are placed; the Palazzo is located from the beginning.
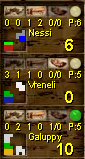
All players are listed here. In each field you can see the construction plan in small format, as well as the freedoms and the number of cards (analogous to the big ad). On the right you can see the prestige points collected so far and the ad for the active player: who is in the row, whose point is displayed in the player color.
If you want to look at the construction plan or the maps/freedoms of the players more detailed, you will receive them by clicking on the corresponding name in the ad.
Game sequence
Each player starts with 3500 Florin cash. The game runs over seven rounds; each round consists of two phases: Phase A is an auction in which each player has an object. In phase B, each player performs two actions per se.
First, each player must return one of his four artists received as start capital. To do this, he clicks on the grayly underlaid artist he not to keep.
Phase A - Auction
After that, the first auction phase starts: the starter is looking for one of the seven items (click on them once) and thus automatically offers 200 Florin for it. The item that is auctioned is always underlined in the player's color. Reihum can now increase the bid by exactly 100 Florin (click on the coin stack) or get out of the auction for this item (click the blue arrow). Each player can only assign one item per round and each item can only be auctioned once. If the first item is auctioned, the first player in the game order, who has not yet given up, will look for the next item. This goes until all players have left a bit.
Landscapes


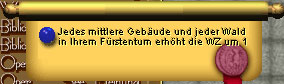
The three landscapes serve as inspiration for the artists. If the landscape preferred by the artist is present (see artist table), this increases the number of works of this artist by three points. Other landscapes of the same type offer no further advantage when performing a work. However, they count three prestige points when buying and can be relevant for prestige cards and bonus cards.
Once a landscape has been acquired, it is necessary to install it immediately on the construction plan. For this, a window appears in which the part can be moved, rotated and mirrored as desired: the upper double arrow reflects the landscape, the inner arrows turn it and the triangles move it. If the part is at the desired location, the green hook is confirmed. Caution: by clicking on the brown cross below, you throw the landscape!
Gaukler

Gaukler increases the number of works by two points. Several palpits are buzzing.
Construction master

The first builder reduces the construction of buildings: one pays only 300 instead of 700 Florin per building. The second builder brings three prestige points when buying and allows to build buildings directly together. The third builder also brings three prestige points when buying and allows free building of buildings. A player can have a maximum of three builders. There are only six builders in the whole game.
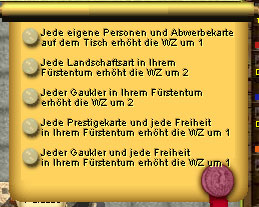
Prestige cards
Prestige cards are hidden winning points. Players can reach three to eight points extra with a prestige card if they meet the corresponding condition at the end of the game. Once you have a prestige card, you get a window with five cards to choose from. Here you choose the cards you choose not to keep. The discarded cards are pushed under the stack again in the order of clicking.
Debt cards

Since the number of artist cards is limited, artists who have already completed their works with other players can be recruited to his court.
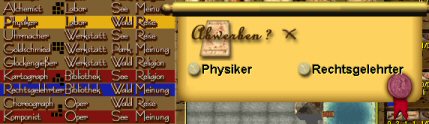
When purchasing the card, you will be asked if you want to purchase. If artists have already performed works with other players and can thus be discarded, they are given their selection in the window and may take one of them; click on the artist you want.
In the example, the physicist (yellow) and the legal scholar (blue) were already played out. So Red gets these two to choose from.
If you don't want to buy, click on the cross in the question window. You can then purchase in phase B at any time later without it costing an action. To do this, you simply click on the advertising icon above the construction plan. Tickets cannot publish a work directly, but in any other way they count as personal cards. When a person is picked up, her previous owner instead receives the (unused) purchase card and thus has no disadvantage. You can't buy your own artists.
Phase B
In phase B, players can select the row after two of the following actions:
- 1 Freedom to buy (300 Florin)
- 1 person card for sale (300 Florin)
- 1-2 bonus cards buy (300 Florin)
- 1-2 buildings (700/300/0 Florin)
- 1-2 Works
- fit (blue arrow)
To do this, simply click on the desired action in the window.
Freedoms

You can buy a maximum of freedom per round. You can only possess any freedom once. If one can offer an artist his preferred freedom (see artist table), this increases the number of works of his work by three points. Each freedom is less present than players participate in the game.
personal card
To perform works and thus collect valuable prestige points, you need many artists at his farm. To the threes you get at first, you can get here for 300 Florin per round one get more artists to his court. If you choose the action, you will get five artists in the artist table for selection (grayly underlaid), of which you will find the four clicked awayThe not to keep. Here, too, the cards are pushed under the stack again in the order of clicking. Since there are only 21 artists, it can happen during the game that you get only less than five to choose from. If there is no more, you can only get new artists to his farm via advertising cards.
Bonus card
A bonus card can single in order to improve the number of works of a work, then it falls. The improvement of the number of works depends on the fulfilled conditions of the card. One can buy 1-2 of them per round, each costs 300 Florin. When buying, you can choose between five cards: here you can also click on the four cards that you can not they are placed under the stack again in the clicked order. There are 20 different bonus cards in the game.
Building buildings
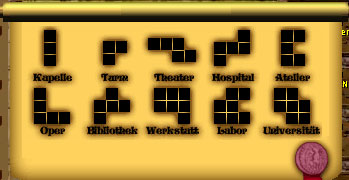
Each artist prefers a certain building to pursue his work. If he is well-being available, he rewards this with four other points of work. To build a building, in phase B you choose the action building. There is a selection window with all types of buildings. Here you choose the desired one and place it analogy to the landscapes. However, it should be noted that the buildings must not touch each other - not the existing Palazzo (exception: two builders)! Only contact with the corners is allowed, but not on the sides! A building costs 700 Florin (exception: a builder -> 300 Florin, three builders -> free) and immediately brings three prestige points. There are three orders: small/medium/large (3/5/7 fields). Each building is only three times in the game, no player can build the same building several times.
Work done
Making a work is free, on the contrary even brings money and/or prestige points.
Once the action "Werk" has been selected, one clicks on one of his artists in the artist table to have a work done. The work points are as follows:
- 4 points for the right building
- 3 points for the matching landscape
- 3 points for the right freedom
- each 2 points per Gaukler
- 1 point per person card (played or on hand; also tickets for purchase)
- X Points for bonus cards
Not all points must be met. The sum of the fulfilled conditions gives the number of works. The further the game is advanced, the higher the required minimum number for a work:
| Round | 1 | 2 | 3 | 4 | 5 | 6 | 7 |
| Minimum | 7 | 10 | 12 | 14 | 15 | 16 | 17 |
If you want to play a bonus card for a work, click before Selection of the work on the bonus card icon over the construction plan. You get an overview of his bonus cards and can choose the one (blue point) you want to use. The desired work is then selected and the bonus points are added automatically.
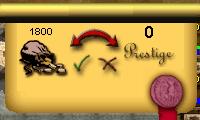
Once a work has been completed, one receives 100 Florin per work point. However, part of the money (or everything) can be paid out in prestige points. Then a prestige point is obtained instead of 200 Florin each. For this, the corresponding part can be set in the rising window with the red double arrow and confirmed with the green hook.
After each round, the player who has released the best work (at the same time all those involved) will receive three prestige points extra.
Playing
The game ends after seven rounds. Now the points for the prestige cards are determined and counted. Winner is who has collected most prestige points. At the same time, the higher cash capacity decides.
Special features
- New cash is usually obtained by performing works. If you urgently need money, you can also click on the money bag in the upper right corner and convert prestige into money; However, he only receives 100 Florin for each prestige point. In case of inability to pay in the auction phase, this conversion takes place automatically.
- It is not possible to dispense with anything at auction, except you have neither money nor prestige.
- You can cancel building creation by clicking on the X in the positioning menu.
- You can decide and not publish a work by clicking on an artist you don't own.
- You can safely click on the X in the Abwerbemenu to save it for later. You can't undo anything else. Especially when you click on the X when positioning a landscape, you just throw it away!