
Origo
Game preparation
With /join 2-5 players can enter the game. With /start the game begins. Alternatively, you can use the game management use.
The game
Origo plays in Europe at the time of the second international migration. The different peoples spread in the countries, which is not always only peaceful. So it is important to establish countries to form clans, to push back opponents or to strike the flight forward. Who can best distribute his people over all the landmarks and collect most of the points, is ruler over Europe at the end.
Field
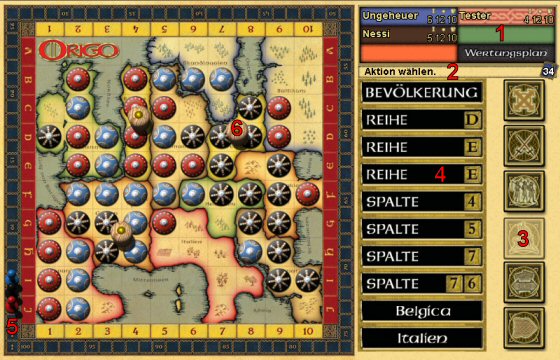
- Player display (player name, score, sign stock, hand cards)
- Status display with card stack
- Actions
- Handcards
- Chief
- Foundation stone
Start of play
There are five different types of cards:

Series cards (26x) designate one or more Series (marked by letters) on the schedule in which the player may act (expand or fight).

Column cards (26x) denote one or more Column (marked by numbers) on the schedule in which the player may act.

Country cards (18x) call a Country on the schedule where the player is allowed to act.

With a population card (16x), the player may act in a field that adjacent (waagright or vertical) to a field already occupied by it.

With a ship card (12x), a player may place a sign on any seafield.
Each player receives at the beginning 10 Cards.
In addition, there are 2/3/4/5 players for each 44/30/25/22 license plate.
With 2/3/4/5 players, the players now reihum alternately distribute 12/8/5/4 of their shields on the schedule. The following shall apply:
- in the large countries (eight fields) may not exceed four Shields lying
- in small countries (< eight fields) maximum two Shields lying
Game sequence
The active player has the following train options, which he may perform in any order:
- Spread or attack (total twice)
- Hiking or exchange maps (once)
- Sailing (one time per ship)
He doesn't have to perform all actions and can even fit completely. At the end of a train, the card hand of all players is refilled to ten.
Spread or attack

To bring a new shield into play, click on the "Share" button, then select one of its cards and place a shield in a corresponding field.

You can only attack fully occupied seas and already established countries (see country formation). The attacked field must be adjacent to one's own and you have to play a corresponding map for this field. You then click on "Apply", then select a suitable card and click on the field you want to attack.
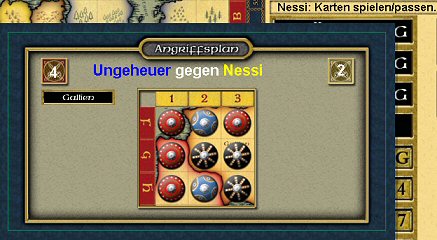
The attack window opens in which the attacked field and its eight adjacent fields are displayed. The current total combat value and the played cards of the attacker are displayed on the left, the defender on the right. The combat value is composed of all their own played cards (in each case two attack points) and their own shields, which lie adjacent to the attacked field (in each case one attack point). The attacked field also counts for the defender with one point.
Here monster attacks Nessi's black shield on G2. With her two blue shields, she already has a battle value of 2. There are also the two points of the played "Gallien" card. Nessi has a basic defense value of 2, namely its attacked shield on G2 and the adjacent to it on G3. So if she doesn't want to lose the fight, she'll have to go.
The defender selects one or more cards that match the attacked field (column, row, population or land) and clicks on the swords. If he thus overdoes the attacker or creates at least one likeness, he must now reconsider to win the battle. This goes back and forth until one of the two players can no longer lay cards or wants. He'll be the white flag. Anyone who can now provide the higher combat value takes over or retains the field. At the same time, the defender wins. The sign of the subordinate party is taken out of the game.
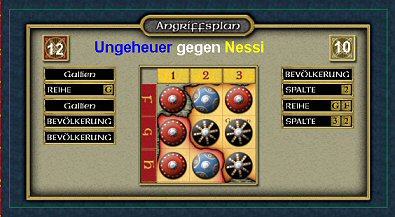
Both parties have still maps. But after four cards Nessi had to fit and lost the fight. The black shield on G2 is taken from the game and replaced by a blue one.
The two actions must always be carried out together: either you spread twice or you fight twice or you spread out and fight once.
Hiking

When hiking, you can take a sign by drag&Drop from one Countrydraw field to an adjacent, adjacent field (country or sea). Own adjacent shields may be skipped. Hiking is only possible once in every train.
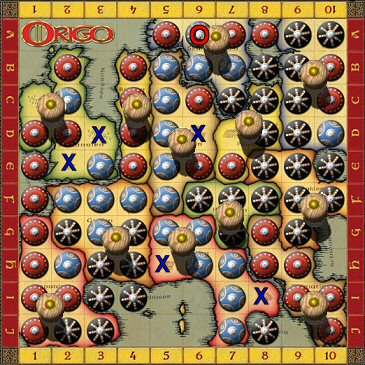
Here, blue could now, for example, migrate to all fields marked with a blue X with the red marked sign on A6.

Instead of walking, the active player may alternatively also exchange exactly two of his cards for two from the draw-off stack. To do this, he selects the "Tauschen" button and then clicks on two of his handcards he wants to exchange.
Sailing

When sailing you can see a sign from a Seadraw field to an adjacent, adjacent field (country or sea). Own adjacent shields may be skipped. Any number of shields can be moved, but everyone can only move once at most.
Country start
- Country foundation stones
- Clan score
- Sea power rating
- Country value
You can call the scoreboard at any time by clicking in the player's ad and close it again.
As soon as the last field of a country is covered with a shield, this country is considered to be established. The foundation stone on the farthest left side of the scoreboard is placed in the country and the player's parental guide is moved further by as many points as is shown on the cleared field of the scoreboard. If the movement of the tribal leader ends on a occupied field, it moves to the next free field.
Every country can only be founded once!
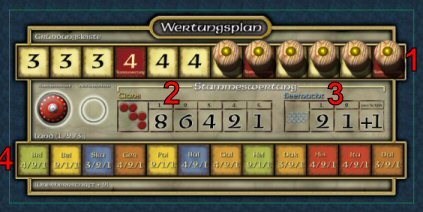
Stem assessment
If the 4th, 8th or 12th value stone is taken from the value bar (red field), at the end of this round a Stem assessment to take place. If a second master rating is triggered in the same round, it will be moved to the end of the next round.
In the case of a tribal evaluation, the clans, the sea power and the countries are evaluated. After the evaluation, the player who is farthest behind determines the new starter.
Clan score
At least three adjacent shields of a player form a clans. A clan can be distributed over several countries and across the sea.
For 1./2./3./4./5. There are 8/6/4/2/1 points. At the same time, the players involved receive the points of the next lower place. If a player has the same size clans of a stage alone, he receives the sum of the same place several times.
Sea power rating
For each shield on a sea field, players get a point. The player with most shields on seafields also receives two points as a bonus, the player with the second largest sea power still gets a bonus point. At the same time, the parties receive the next lower level.
Country value
The countries are valued on the scoreboard from left to right, i.e. starting with Britain and ending with Dalmatia. The player with most/second most/third-party shields in a country receives the highest/second/lowest value of the scoreboard. At the same time, everyone receives the next lower level.
Are in a country All Fields only from a only player settled, so he has the supremacy over this country. It receives the highest score of the score table and additionally two bonus points.
Example of value
Clan score: Blue has to offer the largest clans with 14 contiguous shields and therefore receives 8 points. Black forms the second largest clans with 10 shields and receives 6 points. Red has two clans with 6 shields each. Red gets 2 x 4 points for this. The fourth place falls away due to the double occupancy of the third and black is still 1 point for its 5er-Clan. The 4th of red is empty.
Sea power rating: Red has the largest sea power with 3 shields and receives 2 bonus points, a total of 5 points. Black and blue each have 2 shields on seafields. As they have to share the second rank, none of them get the bonus point. However, the 2 points for the shields get both.
Country value
| Value | United Kingdom | Belgica | Scandinavia | English | Poland | Baltic | Galleries | Helvetien | Dakien | Hispanics | Italy | Dalmatia |
|---|---|---|---|---|---|---|---|---|---|---|---|---|
| Blue | 4 | - | - | 4 | 2 | - | 4 | - | - | 4 | 4 | - |
| Red | 1 | 2 | - | 2 | 1 | - | 2 | - | 2 | - | 2 | 3 |
| Black | 1 | - | 3 | - | 1 | 4 | - | 2 | 3 | - | - | - |
| supremacy | - | Red | - | - | - | - | - | Black | - | - | - | Red |
Playing
The game ends at the end of the round where one of the following conditions is met:
- the last foundation stone is used
- a player sets his last shield
- all players fit within a round
In any case, the started round will be played to the end. The last master evaluation is then carried out. Whose tribal leader has earned most of the points then wins the game.
FAQ
Frequently Asked Questions in the FAQ answered.