Fanshop

Puppets
Puppet Tool
Once you reach the rank of W9/K9 you can initiate a Command Puppet using /puppet CommandPuppet NAME URL or with /puppet start NAME for registered Puppets (see /puppetdef). Sometimes you will need a password to initiate some puppets.(SimplePuppets can be starting from rank W8/K8).
Opening The Puppet Utility

Click on the button "Puppets" in the Toolbar.
Schließen kann man dieses Fenster mit dem roten X oben rechts in der Ecke. Die Kontext-Hilfe zu Puppets erhält man durch Anklicken des blauen Fragezeichens daneben.
With Tool Configuration you can add or remove tools in the tool bar.
No Puppets Started Yet
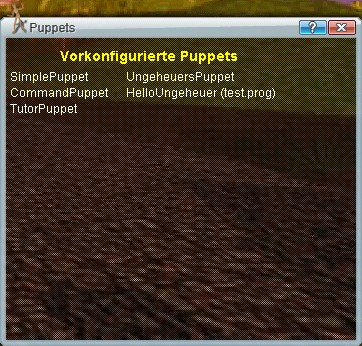
If you have not yet initiated a puppet, then a list of Puppets, which you have in your Prop File are shown. If you have none, then you will see a screen with the entries shown on the picture on the left.
Preconfigured Puppet use the following format:
PuppetTYPE-NAME = URL
whereby TYPE of the standard CommandPuppet type can be omitted.
Ergänzt werden diese Einträge durch eine alphabetische Liste der registrierten Puppets, bei denen man als möglicher Starter eingetragen ist.
You can start a preconfigured puppet by clicking on the appropriate line.
The example entries in the window would correspond to these lines in your prop file if you had them:
PuppetHelloUngeheuer = http://www.meinwebspace.de/Puppets/test.prog
PuppetTutorPuppet
Context Help

The most important help information for the puppet tool is included in the Context Help. Unfortunately this is all in German. Please check the following Wiki pages for help.
Puppets - Introduction
Puppets - List of Commands
Puppets - Tutorial and Example
Puppets - List of Help Puppets
How to Start a Puppet
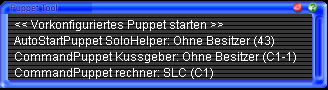
Here 3 Puppets are defined in the users Prop File: SoloHelper, Kussgeber and rechner. These are in the rooms 43, C1-1 and C1. The third puppet is owned by SLC.
If you click on the first line, then the first puppet will be started. If you then click on the puppet you can see the details about the puppet.
Details of the Puppet
By clicking on one of the current Puppets in the overview, you can see the puppet details. These are provided in various tabs in the window.
The puppet type and puppet name are shown in the top banner. If you click here, you end back at the overview screen.
You can manipulate the puppet data, by clicking on the yellow tabs and making changes in the various sheets.
Starting Pre-Configured Puppets
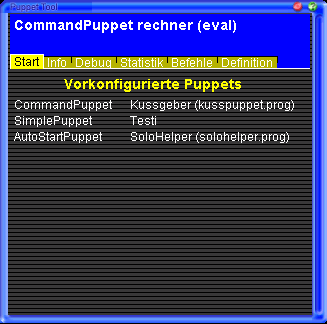
Hier findet man noch einmal die Liste der in der BrettspielWelt.prop vorkonfigurierten Puppets und die alphabetische Liste der registrierten Puppets, bei denen man als Starter angegeben ist, oder alternativ die Beispieleinträge.
You also arrive here if you had clicked on
<< Start Preconfigured puppet >>.
You can start a preconfigured Puppets, by clicking on its appropriate line. If the puppet is already started, then switch to the puppet details screen.
Basic Information
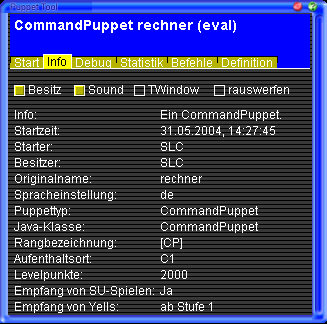
There are 4 check boxes which you can click on.
With the "OWN" switch you can (/own) or (/unown) a puppet.
With the SOUND switch you can select whether the puppet makes a sound when it moves (you must own it to do so).
With the TWindow you can decide whether the puppet communicates in a separate window or in the chat.
With the "KICK" switch you can (/kick) the puppet out of BSW.
You will see a table of parameters which give you information about the puppet.
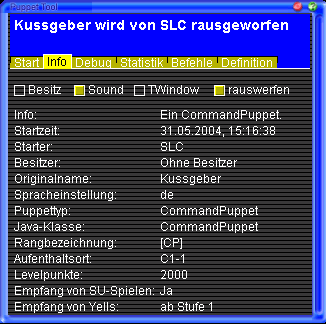
The example on the left shows what the screen looks like if we click on "Kick" ("rauswerfen").
At the top the "kick" action is shown. It can take a few seconds for this action to complete.
If you have the right to "kick" this puppet, at the time which the puppet leaves BSW, your screen will return back to the overview screen.
Debug Mode
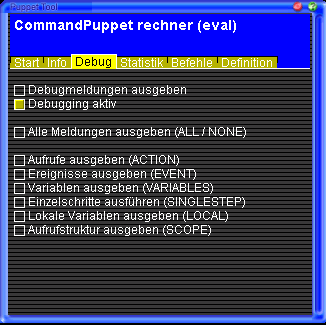
This data tab can be used to simplify controlling debugging a CommandPuppet (for Puppets without a program this data tab is not available). Clicking on "Debugging activated" opens up a specific channel to show debug data for the puppet.
The first two control buttons toggle between "Show debug messages" (On/Off) and "Debugging activated" (On/Off). (This is the same as the commands @@debug ON and/or @@debug OFF).
- SHOW ALL DEBUG MESSAGES = @@debug ALL: Initiates ALL The Debug Modes listed below this button.
- SHOW ALL DEBUG MESSAGES (NONE) = @@debug NONE: Switches off all modes.
- SHOW ACTION CALLS (ACTION) = @@debug ACTION: Responds if 'Action' items are triggered.
- SHOW EVENTS (EVENTS) = @@debug EVENT: Responds if 'Event' items are triggered.
- SHOW VARIABLES (VARIABLES) = @@debug VARIABLES: Shows all the variables used when triggering a sub-command.
- SHOW INFO FOR EVERY STEP (SINGLESTEP) = @@debug SINGLESTEP: Single step mode with indication for each individual instruction, used when triggering a sub-command.
- SHOW LOCAL VARIABLES (LOCAL) @@debug LOCAL: Indicates the values of local variable when triggering a sub-command.
- SHOW SCOPE INFO (SCOPE) = @@debug SCOPE: This command will show the scope of the sub-command requested. The output is in a German format!
Statistics of Current Puppet Values (Snapshot)
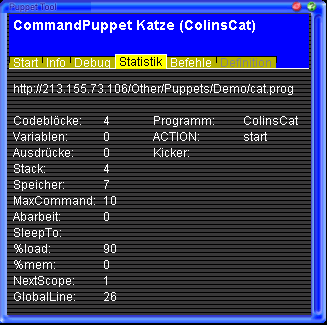
This tab shows some of the variables/registeres for the viewed puppet.
If you have further questions, you can enter /channel puppets and ask there.
The statistics indicate a snapshot in time. In order to get a new snapshot, you must click somewhere on the data page.
Puppet @-Sub Commands
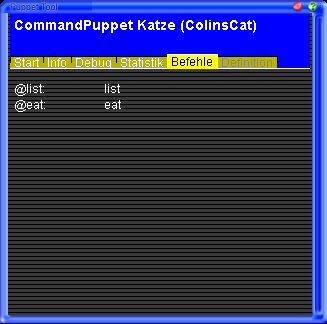
You can view all the defined sub-programs here and call them up.
In the left column is the text command you would use in the command line. The right column shows the name of the sub-program which is called up.
By clicking on the sub-program command, you initiate the sub-program in the debug mode, whereby you can (if you have set the appropriate flags) view what happens.
The recommended @-help sub-progam commands every puppet should have are:
@info - lets a player ask the puppet information.
@home - sends a roving puppet back in its home area.
Registering Puppets
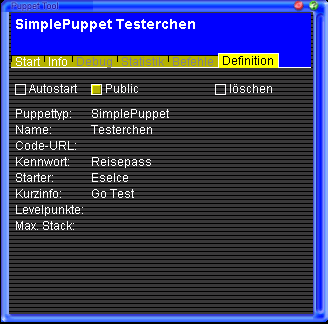
The function page DEFINITION is the same as /puppetdef. This page shows the data about a puppet and from which server it came from.
/puppetdef CommandPuppet NAME URL
This command will simply provide similar information
/puppet start NAME
starts a puppet
- /puppetdef list: Listet alle Puppets auf, die man registriert hat oder für die man als Starter eingetragen wurde.
- /puppetdef info NAME: Zeigt die Daten für eine Registrierung an.
- /puppetdef delete NAME: Löscht eine Registrierung.
- /puppetdef set NAME public pwd=PWD
With the term set you can set several options. The format should be NAME=XXXX (without blanks!) If the value contains blanks, then you must use quotation marks : NAME= " VALUE.
- /puppetdef set NAME public (or public=On): This means that different users can start the puppet, without knowing the URL. When used, the URL, password (PWD), points of level and stack are not indicated , and the data sheets Debug and statistics remain inactive.
- /puppetdef set NAME priv (or e.g. public=Off): Only the indicated owner may start this puppet.
- /puppetdef set NAME type=TYPE (e.g. type=CommandPuppet): Changes the type for a specific Puppet. Possible puppet types are SimplePuppet (SP), CommandPuppet (CP), TutorPuppet(TP) and AutoStartPuppet (ASP). NOTE: You need special authorization in order to set a puppet as AutoStartPuppet.
- /puppetdef set NAME url=URL: Sets the www address for the source code of a Puppet. This must be saved as a text/ASCII file on a Web server.
- /puppetdef set NAME pwd=PWD: This sets a password to access a puppet. Only the indicated starters can see this password.
- /puppetdef set NAME info= " info. ": This provides the ability to add information about this puppet in the registry.
Some additional options remain reserved for the Admins.
If you wish to apply for the Autostart function please contact SLC@brettspielwelt.de.